


The choice that ruins most toilet tile initiatives occurs weeks earlier than any adhesive is blended — it occurs the second somebody picks a sample with out first measuring the place each grout line will land at the bathroom, the door, and the bathe threshold. Good rest room tile structure planning suggestions exist, however nearly nobody applies them earlier than the tile is already ordered. By the point a tile setter is on their knees with a trowel, the end result is already largely mounted. The starting stage is the place the actual ability lives, and nearly no person treats it that method.
Fast Reply
The choice that ruins most toilet tile initiatives occurs weeks earlier than any adhesive is blended — it occurs the second somebody picks a sample with out first measuring the place each grout line will land at the bathroom, the door, and the bathe threshold.
Why Most Tile Tasks Go Fallacious within the Planning Stage
Someplace alongside the best way, tile planning grew to become synonymous with scrolling Pinterest. A temper board will get assembled, a sample will get chosen, somebody orders tile and — three weeks later — stands in a toilet the place the grout strains hit the bathroom base at a 2-inch sliver and the doorway terminates on a reduce so skinny it cracks earlier than the grout dries. I’ve seen this in brand-new intestine renovations. Costly ones.
The hole between a tile structure that appears good in a flat sketch and one which works in a dimensional room comes all the way down to a single ignored variable: grout strains usually are not ornamental afterthoughts, they’re structural reference factors. The place these strains land relative to mounted obstacles — the bathroom flange, the bathe curb, the vainness base — determines whether or not a room appears intentional or improvised. A sketch on grid paper can’t inform you that your drain is 3 inches off the axis your symmetrical structure assumes.
There’s additionally a value argument that almost all planning guides bury or skip completely. Normal observe requires ordering 10% further tile to account for cuts and breakage on a straight lay. That buffer is ok — till you determine on a diagonal or herringbone sample, at which level the industry-recognized overage climbs to fifteen–20% due to the dramatically greater reduce frequency at each wall edge. On a 120-square-foot rest room at $8 per sq. foot of tile, that distinction is almost $100 in materials alone, not counting the added labor time. Order brief, and also you’re praying the dye lot matches.
The psychological shift that adjustments the whole lot: cease pondering of structure planning as a pre-step, and begin treating it because the venture itself. The set up is simply executing a plan that already works on paper.
Sample overages at a look:
- Straight lay: Order 10% further
- Brick or offset patterns: Order 10–12% further
- Diagonal lay (45°): Order 15–20% further
- Herringbone: Order 15–20% further, extra if tiles are small
- Versailles sample or blended codecs: Order 20% further minimal
- Any sample in a room with many angles or niches: Add one other 5% on high of the bottom overage
The psychological shift that adjustments the whole lot: cease pondering of structure planning as a pre-step, and begin treating it because the venture itself. The set up is simply executing a plan that already works on paper.
Actionable takeaway: Earlier than ordering a single tile, draw your rest room to scale on graph paper — not digitally, on paper — and mark each mounted impediment with its precise measurement from the closest wall.
How Tile Scale Truly Works in a Rest room House
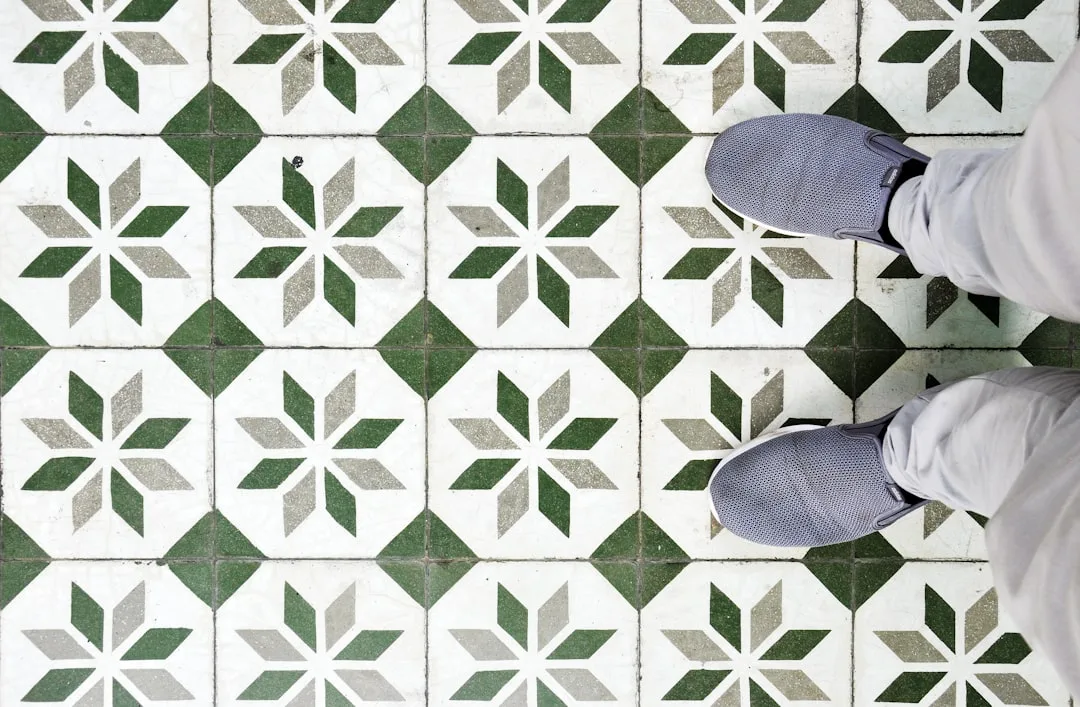
Most of what folks “know” about tile scale in small bogs is mistaken. The obtained knowledge — small room, small tile — will get handed round continuously, and it produces a number of the most visually cluttered bogs I’ve ever walked into. A tiny mosaic tile in a 40-square-foot powder room doesn’t learn as proportionate. It reads as noise.
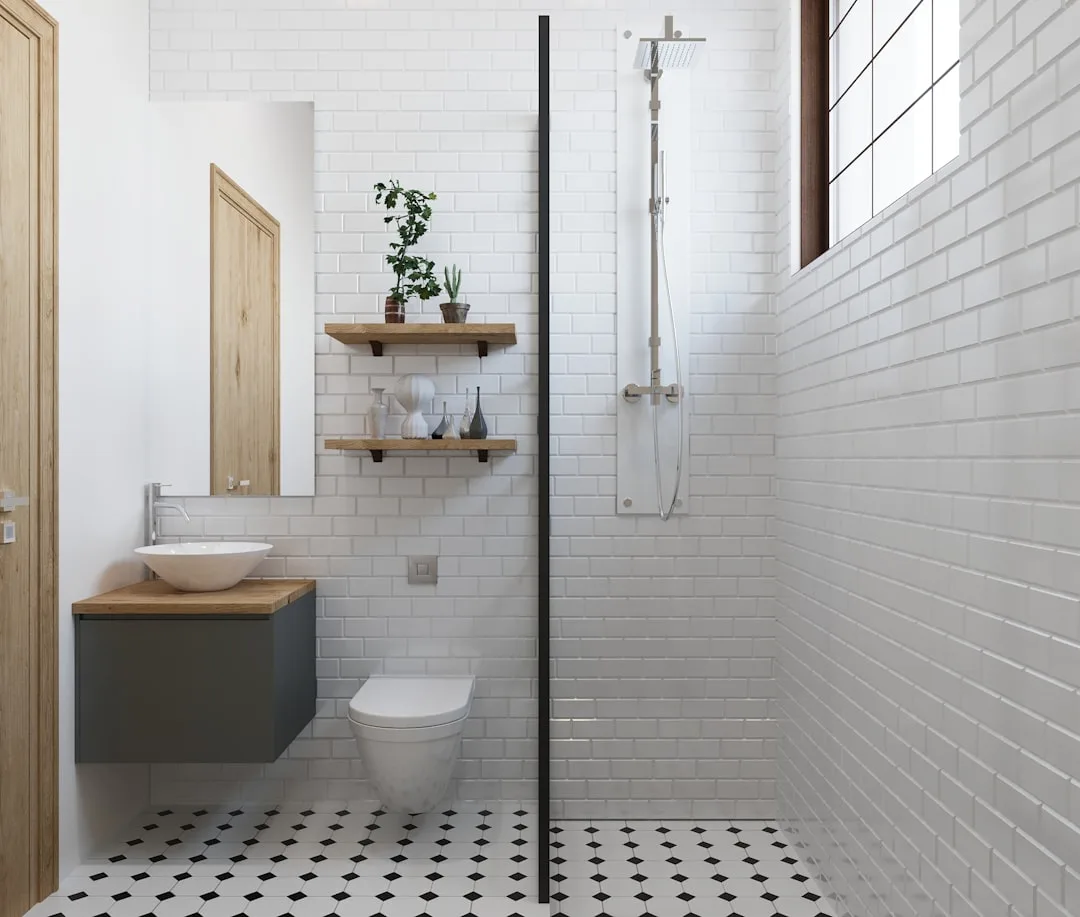
The true relationship between tile dimension and perceived area is about grout line density, not tile dimension. Extra grout strains in a confined area create extra visible interruption, which fragments the ground aircraft and makes it learn smaller. Giant-format tiles — 24×24 or bigger — scale back the grout grid dramatically, which might make a cramped rest room really feel extra steady underfoot. I’ve put in 24×48 tiles in bogs barely large enough to show round in, and the impact was persistently extra open than the identical area tiled in 4×4 subway.
Orientation issues as a lot as dimension. A 12×24 tile laid with its lengthy dimension working horizontally throughout a slender rest room has a measurable widening impact — spatial notion analysis from retail ground planning suggests this will make an area learn as much as 30% wider visually. Lay the identical tile vertically, and also you emphasize ceiling top as an alternative, which reads as extra formal but additionally extra cramped in width. Neither is mistaken. However you need to know which downside you’re fixing.
The rule of thirds is a helpful test for proportion when you’ve chosen your area tile:
- Area tile ought to occupy roughly two-thirds of any given wall or ground floor
- Accent rows or ornamental bands work greatest at one-third top on a wall — not centered, not on the high
- Borders at ground perimeter must be proportional to the sphere tile, not chosen independently
Frequent scale errors to keep away from:
- Selecting 1×1 or 2×2 mosaic for a ground smaller than 50 sq. ft — the grout grid overwhelms the area
- Utilizing the identical tile dimension on the ground and partitions with out various the orientation — the room loses definition between planes
- Choosing an outsized tile (24×48 or bigger) with out confirming your subfloor is completely flat — large-format tiles bridge imperfections quite than conform to them, which causes lippage at tile edges
- Centering an ornamental medallion within the ground with out accounting for the way furnishings, the bathroom, and the vainness will visually compete with it
- Mixing two completely different grout line widths in the identical room — even a 1/16-inch distinction reads as error quite than intention
One factor I discovered from a venture in a Chicago high-rise: a 2-inch marble border round a 12×12 area tile in a 5×8 rest room didn’t learn as elegant — it learn as an image body round one thing too small to border. Scale has to cascade persistently by means of the entire room.
Actionable takeaway: Earlier than committing to tile dimension, tape a chunk of kraft paper reduce to your tile dimensions onto the precise ground and step again to the doorway. Your mind will inform you instantly whether or not the size is true.
Studying Your Room Earlier than You Contact a Tile
Most tile planning guides begin with measurements. That’s truly the second step. Step one is knowing what the room is doing visually earlier than you impose a grid on it.
What I name a room audit — and what most contractors skip completely of their pleasure to start out chopping — is a diagnostic go by means of the lavatory that identifies the place the attention goes, the place it will get caught, and which surfaces carry probably the most visible weight. The solutions change the whole lot about the place a structure ought to begin and the place it ought to terminate cleanly.
Figuring out the true focal wall is the primary job. Individuals assume that is the longest wall, or the wall behind the vainness. Usually, it’s neither. The focal wall is the primary floor absolutely seen from the doorway — the factor your eyes land on whenever you open the door. That’s the place your structure ought to terminate cleanly, that means full tile or a deliberate design reduce, by no means an unintended sliver. Each different wall solutions to that call.
From there, you map your mounted obstacles. These usually are not negotiable:
- Bathroom flange middle — sometimes 12 inches from the completed wall, however confirm this; it’s typically not
- Bathe drain — if it’s off-center within the bathe ground, a symmetrical structure would require customized cuts on each single course, a incontrovertible fact that plumbers and skilled tile setters persistently flag as probably the most ignored constraint in rest room tile structure planning
- Vainness base footprint — particularly if it’s a freestanding vainness sitting on tile, the entrance edge can be seen and will fall on a full tile
- Bathe curb place — this can be a transition level the place tile meets tile at a top change, and it must be deliberate, not improvised
- Door swing radius — in tight bogs, the arc of the door typically sweeps throughout a nook of the ground that’s extremely seen; plan a full tile or sturdy reduce there, not a wedge
- Ground heating mat edges — when you’re putting in radiant warmth, the mat boundary impacts the place thinset depth adjustments, which might affect structure beginning factors
After mapping obstacles, do the sightline check. Crouch at door top — actually crouch, as a result of that’s near the attitude you’ll have whenever you open the door from a hallway — and take a look at the place the grout strains can be most distinguished at eye degree. That is notably helpful for wall tile: the horizontal grout line that hits your eye degree on the first focal wall is the one which needs to be degree, plumb, and intentional. If it falls at 54 inches and your wall has any deflection, you’ll discover it each time you stroll in.
What your room audit ought to doc:
- The focal wall and its precise dimensions, together with any interruptions (home windows, niches, pipes)
- Each mounted impediment with its distance from two perpendicular partitions
- The situation of present plumbing rough-ins and whether or not they fall on or close to your deliberate grout strains
- Any out-of-square corners — measure diagonally throughout the room; if each diagonals don’t match, your room isn’t sq., and your structure must account for that earlier than the primary tile goes down
- The peak of any present options the tile will meet: window sills, wainscoting, present wall ledges
Rooms that aren’t sq. — and most bogs in older properties aren’t — require a structure determination early: do you run parallel to at least one wall and let the opposite wall’s cuts widen steadily, or do you break up the distinction and settle for barely angled cuts on each side? Neither method is mistaken, however leaving that call to the installer after the tile is ordered is how initiatives go sideways.
The Dry Format: The Step Nearly Everybody Skips
There’s one rest room tile structure planning tip that separates skilled installers from everybody else, and it prices nothing besides time: the dry structure. Earlier than mixing any adhesive, earlier than committing a single tile completely, you pull a full dry run throughout the ground utilizing the precise tiles.
This isn’t nearly catching measurement errors. It’s about seeing issues your drawing couldn’t predict:
- Tile variation inside the field — pure stone and even some porcelain tiles differ in shade, veining, or floor texture from piece to piece; the dry structure enables you to distribute variation deliberately quite than by chance clustering all of the darker tiles in a single nook
- Lower frequency at partitions — your scale drawing could present a 6-inch reduce on the far wall, however whenever you see an precise 6-inch sliver of 12×24 tile sitting towards the baseboard, it’s possible you’ll determine to shift the entire structure 3 inches to make that reduce 9 inches as an alternative
- Sample alignment at thresholds — in case your rest room connects to a hallway or adjoining room with tile, the dry structure reveals whether or not the grout strains align throughout the transition or create a jarring visible break
- Lippage at subfloor transitions — in case your subfloor has a seam or top change that wasn’t apparent through the room audit, the dry-laid tiles will rock barely at that time, catching it earlier than the thinset does
How one can do a correct dry structure:
- Snap your centerlines utilizing a chalk line — discover the middle of the room, then alter off-center if essential to keep away from small cuts on the most seen partitions
- Lay tile out in each instructions from that centerline with out adhesive, utilizing tile spacers to simulate your grout joint width
- Stroll the whole perimeter and file each reduce dimension in your scale drawing
- Consider each reduce towards the “half-tile rule” — no reduce must be lower than half a tile width; whether it is, shift your centerline
- Test each threshold, transition, and impediment intersection earlier than you commit
- {Photograph} the dry structure from the doorway so you will have a reference if tiles get disturbed throughout set up prep
The dry structure takes two to 4 hours on an ordinary rest room ground. It catches issues that may in any other case price a full day of demo and reinstallation. It’s, with out query, the highest-value step in the whole course of.
Grout Line Width and Why It’s a Planning Resolution, Not a Ending Element
Most individuals decide grout coloration weeks after the tile is ordered. Grout line width normally will get even much less consideration — it’s handled as a default, regardless of the installer sometimes makes use of. That’s a mistake, as a result of grout joint width has a direct impact on how sample reads, how forgiving the structure is of subfloor imperfection, and the way the room ages.
Grout joint width by tile kind — what truly works:
- Rectified tile (machine-cut to specific dimensions): 1/16 to 1/8 inch — tight joints emphasize the tile face and reduce the grid
- Non-rectified tile (pure variation in dimension): 1/8 to three/16 inch minimal — the broader joint absorbs the scale variation between tiles
- Pure stone: 1/8 inch or wider, relying on how the stone was reduce; tighter joints on pure stone trigger edge chipping over time as the fabric expands and contracts
- Mosaic tile on mesh backing: sometimes 1/16 inch between tiles, however the grout grid is so dense that coloration turns into the dominant visible ingredient — select grout coloration earlier than you order tile, not after
- Giant-format tile (18×18 and above): minimal 3/16 inch is commonly really useful to permit for slight warpage within the tile itself, which is widespread in large-format items and causes lippage at very tight joints
Grout coloration is a separate however equally loaded determination. A grout that intently matches the tile reads as steady and makes the room really feel bigger. A contrasting grout reads as a geometrical sample and attracts consideration to the grid — which is strictly what you need in a subway tile kitchen, and precisely what you don’t need when the grid is hitting awkward cuts round your rest room.
Grout coloration selections simplified:
- Matching grout coloration: use whenever you need the tile to learn as a floor, not a sample
- Barely lighter grout than tile: brightens the grid subtly, good for darkish area tile
- Contrasting grout: use solely when each grout line is intentional and the structure is clear — distinction punishes dangerous cuts
- White grout in high-traffic areas: appears good at set up, requires sealing and common upkeep; be trustworthy about your cleansing habits earlier than committing
FAQ
What is step one in rest room tile structure planning?
Step one is a room audit, not measurements. Earlier than you contact a tape measure, stroll the room and establish the focal wall — the primary floor absolutely seen from the doorway — and map each mounted impediment: rest room flange, drain, vainness base, and bathe curb. Measurements come subsequent, however they’re solely helpful as soon as you realize which surfaces and transitions are driving the structure selections.
How do I do know if my rest room tile structure will look balanced earlier than set up?
Do a dry structure utilizing your precise tiles, with out adhesive, throughout the complete ground. Mark your centerlines with chalk first, then lay tile out in each instructions utilizing spacers. Stroll the perimeter and file each reduce. The half-tile rule is your benchmark: no reduce at any seen wall or impediment must be lower than half a tile’s width. Whether it is, shift your centerline till cuts are balanced on opposing partitions.
Does tile dimension actually have an effect on how massive a small rest room appears?
Sure, however not in the best way most individuals assume. The impact comes from grout line density, not tile dimension itself. Extra grout strains create extra visible interruption, which fragments the ground aircraft and makes an area learn smaller. Giant-format tiles — 24×24 or bigger — scale back the variety of grout strains considerably, which tends to make a small rest room really feel extra open. Orientation issues too: working an oblong tile’s lengthy dimension horizontally throughout a slender room could make it learn measurably wider.
How a lot further tile ought to I order for a herringbone or diagonal sample?
For a herringbone or 45-degree diagonal lay, order 15–20% further past your sq. footage. These patterns require cuts at each wall edge and at each impediment, dramatically growing reduce frequency in comparison with a straight lay, which generally wants solely 10% overage. In rooms with many angles, niches, or irregularities, add one other 5% on high of that. Working brief on a dye lot mid-project is likely one of the most typical and avoidable tile set up issues.
What’s the commonest rest room tile structure planning mistake folks make?
Selecting a sample earlier than measuring the place grout strains will land relative to mounted obstacles. Probably the most frequent result’s a grout line hitting the bathroom base at a sliver reduce — generally lower than 2 inches — which appears unplanned and is structurally weak. The second most typical mistake is skipping the dry structure completely, which suggests the primary indication of a reduce downside is after the adhesive has already cured. Each errors are completely preventable with correct planning earlier than a single tile is ordered.