


That is an excerpt from Advantageous Woodworking #11, Summer season 1978
Click on right here to learn the total digitized difficulty.
Except for those that make solely chairs, the makers of furnishings are recurrently known as upon to professionalduce items with a number of drawers. Usually the design of the drawers should meet particular necessities. For instance, a china cupboard often has not less than one felt-lined drawer with dividers; one drawer in a desk ought to have provision for pens, pencils, and different small provides. Drawer exteriors may demand particular consideration. A chest of drawers is an efficient instance of a chunk of furnishings whose look is determined by the proportions, form, and materials of the drawer fronts.
On this article I’ll have a look at what goes into making and becoming a drawer. The strategies and proposals given right here apply to conventional, first-class work, they usually contain handwork. For the massive manufacturing jobs a shaper or router with dovetail attachments considerably reduces the time.
A drawer has a entrance, two sides, a again and a backside. The entrance should match or complement the piece of furnishings of which it is going to turn into an element, and subsequently the wooden is chosen primarily for look. The thickness of a strong entrance shouldn’t be lower than 2 cm (3/4 in.) with the intention to have sufficient materials for dovetails, and for a mortised lock if the client desires one. As a rule the grain of the entrance runs horizontally. To do in any other case would end in a drawer which might don’t have any power with out uncommon measures to strengthen the joints. Furthermore, the drawer entrance would bear appreciable dimensional modifications attributable to fluctuations in humidity.
These issues don’t exist with plywood fronts, as a result of the course of the grain within the face veneers is of little consequence. Plywood fronts are sometimes utilized in easy, fashionable furnishings and in kitchen cupboards. To protect the sample of the face veneers, significantly when the grain is vertical, no rails present between the drawers. Due to this, and since plywood drawer fronts want a veneered high edge, their building and becoming are fairly completely different from solid-front drawers and fall outdoors the scope of this text.
The wooden for the edges and again doesn’t have to match the entrance. Potential to withstand warping, to be hard-wearing and to complete properly are a very powerful concerns. Relying on availability, ash, beech, birch, maple, oak, or sycamore can be utilized. Cedar, fir, pine, poplar, and spruce are much less passable as a result of they don’t stand as much as arduous put on. Sides are 8 mm to 12 mm (5/16 in. to 1/2 in.) thick, and the again has both the identical thickness as the edges or a little bit bit extra. The course of the grain in a drawer aspect should allow you to airplane it from entrance to again alongside the highest edge and on the skin. If the grain runs the improper approach and the drawer sides can’t be planed from entrance to again, you threat damaging the drawer entrance when becoming the highest edge or when the outsides of the drawer cleaned up after meeting. The second factor is that when a drawer aspect has any tendency to bow, it have to be positioned with the hole aspect out. When the underside is put into the drawer, the aspect will straighten routinely. If the drawer aspect curves out, binding will probably be a continuing downside. Naturally, if the aspect has something greater than only a slight bow, it ought to be rejected.

The underside is often fabricated from plywood, 3 mm to six mm (1/8 in. to 1/4 in.) thick. Heavier plywood could also be used for extra-large drawers or when the burden of the contents goes to be extreme, though thinner plywood with a reinforcing heart strip glued beneath it’s most well-liked for higher work. Birch and beech are good selections for plywood bottoms and they’re available in a number of thicknesses. For first-class work, Douglas fir or poplar plywood shouldn’t be thought of until the underside is lined. Conference dictates that the grain on the underside run in the identical course as that of the drawer entrance. This implies you don’t have any alternative however plywood when the drawer has a vertical entrance, since there is just one approach a strong backside can go in: with the grain working backward and forward. The grooves for the underside have to be neither too tight nor too unfastened. Within the first case, the underside could drive the edges aside or trigger them to separate; within the second, the drawer could rattle. Additionally it is vital that the width of the underside be correct, to make sure that the drawer stay sq. and that the edges keep straight. The underside ought to be lengthy sufficient to increase 2 mm to three mm (1/8 in.) past the again of the drawer, however not as long as to be even with the ends of the edges. In the event you ought to must shorten the edges through the remaining becoming, you do not need to must trim the underside too.
Earlier than plywood grew to become accessible, and even after that however earlier than it was accepted for high-grade furnishings, drawer bottoms have been at all times made strong. I see no benefits in utilizing strong bottoms for up to date work. However they’re a should for sure reproductions if they’re to look genuine, and within the restore and restoration of outdated furnishings when the unique situation have to be preserved or restored. A strong backside requires a good quantity of labor and it’s not one thing that’s extremely seen or instantly obvious to an uninformed observer, and for that purpose not appreciated.

Appropriate timbers for strong bottoms are clear pine, spruce, fir, and basswood. If woolens are to be saved within the drawer, fragrant cedar is likely to be thought of. Desire ought to be given to quartersawn boards, and the wooden have to be thoroughly dry. You must intention for a backside with most stability and most freedom from warping and cupping. The boards are edge-glued to acquire a width equal to the depth of the cupboard. The grain of a strong backside should run backward and forward, in order that the shrinkage and growth of the underside can then be allowed for in the back of the drawer, the underside may be glued to the entrance, and the edges will probably be stored sq. with the entrance as a result of there is no such thing as a motion of the underside in that course.
A thickness of 5 mm to six mm (1/4 in.) is nice for many drawers if they don’t seem to be too vast, however in restore work or in reproductions the thickness could must be rather more. When the unique was made, thicknessing was accomplished by hand, and the sawmill didn’t present boards a lot thinner than 1 in. The underside was made like a panel, with the middle half left the total thickness and a border about 1-1/2 in. vast throughout it planed all the way down to 1/4 in. or 3/8 in. The flat aspect of the panel was positioned on the within of the drawer. The width of a strong backside have to be an ideal match within the drawer. The grain runs on this course, and this dimension subsequently doesn’t change. The entrance to again size of the underside (throughout the grain) have to be such that at its driest the underside is not less than even with the bottom of the drawer again, and that on the different excessive the underside doesn’t prolong past the drawer sides. The underside is screwed to the again with flat head screws. The screw holes within the backside are elongated throughout the grain of the underside, in order that the underside can transfer and nonetheless be held. This eliminates the hazard of splitting (winter) and buckling (summer season). The underside have to be glued to the drawer entrance with good-sized glue blocks. Don’t glue the underside into the groove on the entrance, as a result of this might make future repairs very troublesome. It’s crucial that the underside and the entrance be securely stored collectively, else the bottom will pull out of the groove when the wooden dries.
Meeting
Assuming that each one materials has been chosen and reduce barely oversize, and all of the elements have been paired and marked (“Triangle Marking,” Fall ’77, p. 46–47), becoming and meeting can start. Notice the order, becoming comes earlier than meeting.

Take the drawer entrance and airplane the underside edge. It have to be made true and parallel to the highest edge, and the peak of the drawer entrance have to be an ideal match within the drawer opening. Sq. one finish of the drawer entrance and place it within the opening to scribe the opposite finish. It doesn’t matter whether or not this mark is made on the face or on the within of the drawer entrance, however reducing have to be accomplished on the face as a result of reducing from the within could depart the face tough. When the second finish has been reduce you could have a entrance that matches the opening precisely. No drive ought to be vital to put the entrance within the opening, however there ought to be no clearance both at this stage.
The again is subsequent. Its high and backside edges have to be parallel to one another. The gap between them, that’s, the peak of the again, is lower than the peak of the entrance. It’s not attainable to provide precise measurements, however it’s from 2 cm to 2.5 cm (3/4 in. to 1 in.) much less. The underside of the again should clear the drawer backside when the underside is slid into place, and the highest edge is decrease than the edges by about 0.5 cm (1/4 in.). This clearance on the high of the again permits air to flee when the drawer is being closed. With out it a properly becoming drawer acts like a piston. The size of the drawer again have to be the identical as that of the entrance.
The drawer sides will need to have a real backside edge, and the ends of the edges have to be sq. to this backside edge. The peak of the edges is of no consequence but, offered that it’s greater than is finally required: The perimeters ought to be just a bit too excessive to suit into the drawer opening. The size of the edges is the same as the total inside depth of the cupboard (from the face of the entrance rail to the within of the again) minus the 0.5 cm (1/4 in.) or so you allow within the drawer entrance for half blind dovetails. In a cupboard with out a again, or whose again shouldn’t be sturdy sufficient to behave as a drawer Cease, measure to a rail or cease, securely mounted as shut as attainable to the again of the cupboard. Thus the drawer stops are at all times current, and glued, and the drawer sides are fitted to those stops. It’s a good observe to make the drawer sides so long as attainable, even when the drawer itself is brief. That is some insurance coverage towards a drawer being pulled out too far and falling on the ground, and the wear and tear from the edges on the entrance rail is extra even.
So now now we have a superbly becoming drawer entrance, a again precisely so long as the entrance however decrease than the entrance, and two sides with straight backside edges and sq. ends. Earlier than placing these items apart, restore the pairing marks on the highest edges the place vital. If the piece of furnishings has a couple of drawer, repeat the entire process for every drawer. Yet one more factor stays to be accomplished earlier than the drawers may be assembled. A groove have to be made within the drawer fronts and sides to obtain the underside. The reference line for this groove is the underside fringe of the drawer fronts and sides; that’s, take measurements from this edge. The depth of the groove should not exceed half the thickness of the edges, and sufficient wooden have to be left between the groove and the underside fringe of the drawer to permit clearance and to help the underside with out hazard of splitting the edges.
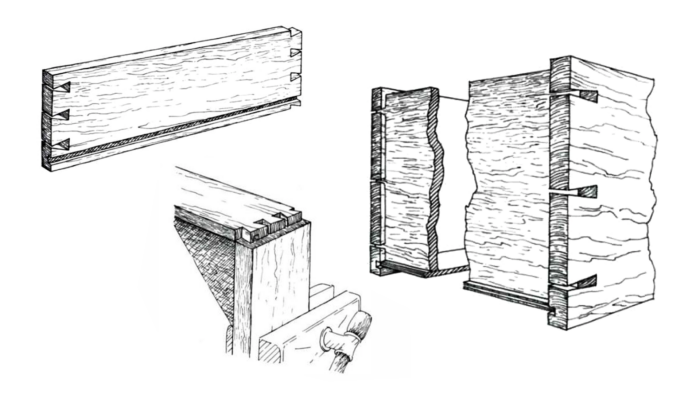
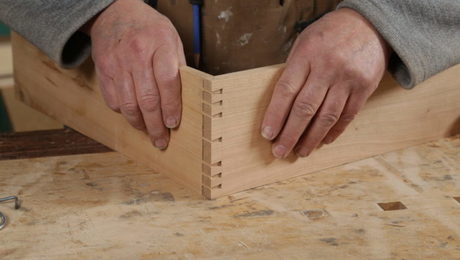
The following step is making dovetails at each ends of every aspect. The half-blind dovetails becoming a member of the drawer sides to the entrance shouldn’t current any difficulties (“Hand Dovetails, ” Spring ‘76, p. 28–32). Alternatively, the joint I exploit on the again would possibly seem unconventional to some. The perimeters prolong roughly 0.5 cm. (1/4 in.) past the again for a drawer as deep as the cupboard.

As a result of the dovetails prolong past the again of the drawer, they give the impression of being finest when the tails are vast—nearly touching every other-and the pins on the drawer again are small. The illustrations ought to make this clear. Dovetails will not be sensible in the back of shallow drawers with lengthy sides. It’s higher to affix the edges and the again with a sliding dovetail, by which the again is slipped into place from under, or let the again right into a dado within the sides.

When all of the dovetails have been reduce, the placement of the pins is marked on the drawer fronts and on the again. The underside edges have to be used once more for reference, however as a result of the grooves for the drawer backside have already been made with the underside edge as reference, the grooves can now be used to align the drawer sides, fronts and backs. Take a small piece of the plywood you propose to make use of for the underside, insert it within the grooves of each the drawer entrance and its mating aspect, and the 2 items will probably be accurately aligned and can keep that approach whilst you scribe the pin areas. The drawer again has no groove however it may be held towards the piece of plywood to align it with the edges.


I don’t dry-fit dovetail joints. They’re too simply broken in becoming, with a subsequent loss in accuracy within the remaining joint. By holding one piece on high of the opposite it’s not troublesome to evaluate the match, and it’s fully attainable to acquire excellent outcomes with out truly assembling the joint first.
Yet one more commentary earlier than we return to creating drawers. Many employees divide an area in equal pans when laying out dovetails. This leads to half-pins which can be typically too small. Dovetails rely for his or her power on a wedging motion. If the 2 outdoors dovetails are too near the sting, not sufficient wooden is left to maintain the joint tight and closed underneath all circumstances. Extreme strains on the joint could even trigger a break up to start out on the half-pins. The reply is wider half-pins. They are often achieved both by making the 2 outdoors dovetails a little bit narrower than these within the heart, or by setting out the half-pins first after which dividing the remaining area evenly.
With all of the dovetails made and able to be glued up, now’s the time to wash up the insides of all of the items, and polish or paint them if you’re so inclined. Lastly the drawers may be put collectively. Care have to be taken to maintain them sq. whereas the glue is drying.
In the event you take a board or a chunk of plywood, 2 cm (3/4 in.) or extra thick and a little bit bit longer than the width of your bench, and put this throughout your bench, you could have a great help for the drawer when you find yourself planing the outsides clear. The board have to be secured to the bench, and if the within of the drawer is already completed, the overhanging finish of the board have to be coated with cardboard or fabric. Clear up the skin of the drawer, and you might be prepared for the underside. Some employees prefer to have the underside within the drawer once they work on the edges, however leaving the underside out is extra passable as a result of it permits a lot better help. The drawer appears finest when the underside is simply lengthy sufficient to increase to the skin of the drawer again, or perhaps 2 mm or 3 mm (about ⅛ in.) past that. It shouldn’t be fairly so long as the drawer sides. When the underside has been sanded and completed, it ought to be inserted and screwed to the again of the drawer. It is a first-class drawer and nails merely received’t do. If the underside is plywood, use two or three flathead screws, countersunk. Whether it is strong, use screws in slots to permit for motion.

Some employees prefer to put glue blocks on the underside of the underside alongside the drawer entrance and sides. Glue blocks are made out of sq. materials about 8 mm (3/8 in.) on a aspect and are roughly 5 cm (2 in.) lengthy. Two of the lengthy surfaces are coated with glue, and the block is rubbed backwards and forwards a couple of instances within the desired location. The rubbing will distribute the glue evenly, and in case you do it proper, there will probably be a lot suction that it shortly turns into unimaginable to maneuver the block. Clamping shouldn’t be vital. I consider that glue blocks will not be vital when the inventory is dry and free from defects. But when there’s any doubt that the drawer entrance or sides will keep flat and straight, glue blocks present peace of thoughts.

The perimeters of the drawer are nonetheless too excessive. The peak of the drawer entrance ought to be scribed onto the edges, and the highest edges ought to be planed all the way down to make them even with the drawer entrance. In the event you did all the things proper, you now have a drawer that matches tightly within the opening, extra so in top than in width. It’s because the peak has not been modified since becoming the drawer entrance, however the width has been barely lowered by cleansing off the skin dovetail joints. The discount is hardly noticeable, but it surely gives simply the clearance the drawer wants throughout its width. Clearance in top is obtained by taking one shaving off the highest edges of the entrance and the edges. That is in all probability all it’s good to produce a drawer that matches properly and strikes freely. In the event you assume the drawer continues to be too cosy, take off another, very mild, shaving, however solely after you could have rubbed a candle alongside all the perimeters and tried the drawer as soon as extra. Paraffin can be good to make the drawer slide higher, however beeswax or different sticky substances shouldn’t be used as a result of they entice mud.
The size of the edges can now be checked. The place the drawer entrance goes to be in relation to the entrance of the cupboard is decided by the size of the drawer sides, as a result of the drawer stops are already in place. The entrance of the drawer may be flush with the cupboard, by which case you shouldn’t must do something to the drawer sides. A entrance recessed no more than 1 mm (a fats 1/32 in.) typically appears higher than a superbly flush entrance.
If a recessed entrance is desired, the edges have to be shortened by 1 mm or much less. For individuals who haven’t but been uncovered to the upcoming metric system, your thumbnail is about 1 mm thick. As a completion, barely break the sharp edges of the drawer, give the final 2 cm or 2.5 cm (1 in.) of the highest fringe of the drawer sides a slope to correspond to the slope of the dovetails, and chamfer the protruding dovetails on the finish of the drawer sides.

A drawer with a molded entrance is made as described above, with one distinction: The dovetails becoming a member of the edges to the entrance are via dovetails, and the size of the edges is the same as the depth of the cupboard minus the thickness of the molding. The molding shouldn’t be utilized till the drawer has been fitted and all changes have been made. The molding covers the uncovered dovetails within the drawer entrance. One of these drawer is reserved for extra conventional work.

A drawer with an overlapping entrance should match completely when assembled, as a result of the outsized entrance makes subsequent planing unimaginable. The rabbeted a part of the drawer entrance should match within the cupboard with simply the best diploma of clearance, and the drawer sides should even be the best top earlier than the drawer could also be assembled. They are often planed and checked within the opening earlier than meeting. It’s considerably tougher to provide this drawer an ideal match due to its building. Alternatively, the very characteristic that makes becoming troublesome, that’s, the overlap, additionally conceals a less-than-perfect match. The inventory for this drawer entrance ought to be thick sufficient to allow dovetails 12 mm to fifteen mm (1/2 in. or extra) lengthy, with sufficient left for an overhang that’s not going to interrupt the primary time the drawer is closed. Though one of these drawer doesn’t appear to want stops, it’s extremely really helpful that the ends of the edges, not the overlapping edges of the entrance, take the impression on closing.
A very completely different approach of constructing an overlapping drawer is to make a flush-front drawer first. The overlapping entrance is a separate piece connected after the drawer has been fitted. When this methodology is used it’s crucial to have stops behind the ends of the drawer sides. If this isn’t accomplished, chances are high that the separate entrance will ultimately turn into a separate entrance in a really literal approach.

Join eletters as we speak and get the most recent methods and how-to from Advantageous Woodworking, plus particular provides.