

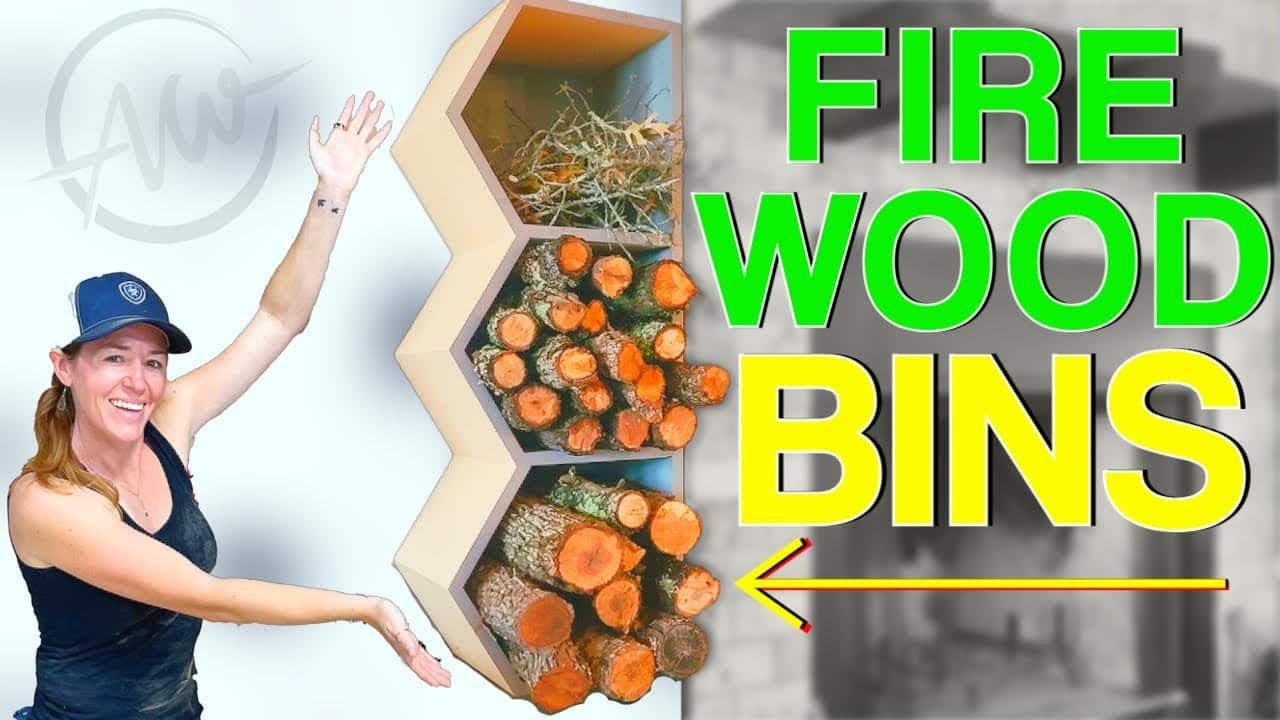
In the event you’re on the lookout for a spot to retailer your firewood that is also tremendous cool to have a look at, take a look at this firewood holder DIY. Earlier than, I might simply have my completely different sizes piled up in containers across the fireside, which was actually unattractive. So on a whim I threw these collectively. The three compartments enable me to separate small, from medium, to giant items of wooden. Seize a set of plans and let me present you ways I construct them.
Let’s Construct A Firewood Holder


DIY Firewood Holder Plans
$9.99
I’ve created a set of plans to make constructing this firewood holder fast and simple!
Supplies I Used on this Construct:
Step 1: Deciding on Materials and Chopping to Dimension
I did design and construct these on a whim so when deciding on materials, I simply seemed round my store to see what I had already that might match the sizes. I discovered this stack of three/4” minimize off from some cabinets I tore an element that I’ll make the physique from. Then for the again, I’ve some 1/2” plywood from who is aware of what.
I began off by ripping the sheets right down to width wanted. If you’d like precise dimensions, I’ve a set of plans obtainable over on my web site. I tilted the blade over to then minimize within the angles wanted to created the pointed miters. Since there are loads of repeated elements, I arrange a cease block in order that I may make all of them the identical. If you do that, you need to ensure to set the cease block again far sufficient so the board received’t be touching it when it contacts the blade. As that is what could cause chill.
To save lots of from switching the blade backwards and forwards, after slicing one facet with the wanted angle, I might flip the board and minimize the opposite facet because it nonetheless had a 90 on one finish. This may depart the remaining board with angles on each finish, that I can chop up for the mitered elements. I personally wish to all the time do a check first and a dry match to verify issues are going to work as I’ve them deliberate. That appears good although.

Step 2: Banding the Edges of the Firewood Holder
Now I simply wanted 12 of them whole so I locked within the new distance for the fence for this half and chopped up the remaining bit into items.
This undertaking solely consist of 4 completely different elements. What I’ll name the facet, the tops that are barely longer than anything, the horizontal cabinets, then the mitered factors. Remember that it might be easy so as to add extra to subtract the variety of cubbies, relying in your areas wants.
Alrighty, now I’ll edge band the sides that shall be dealing with the entrance. Truly, on second thought, I like the concept of portray them as an alternative. Notice: that in the event you edge band you’ll want to do this earlier than becoming a member of the elements collectively, however if you wish to paint, then you may go straight into assembling.

Step 3: Assembling the Firewood Holder Cubicles
For assembling, I began off on prime of my workbench and what I did is apply some wooden glue, I’m utilizing DAPs weldwood right here, to each joint, then pin nailed issues collectively utilizing my 23 gauge nailer. It is a fairly weak joint till the wooden glue has time to arrange, so I used to be being cautious as I used to be shifting it round to connect the following leg. If I didn’t have a 23 gauge, I might have used a 18 gauge as an alternative.
After getting a number of connected, I assumed it might make issues simpler to do it on the bottom so I may see every thing clearly as I used to be attaching legs. So I moved it right down to the ground and continued. I might juke and jive to create the factors of the cubbies, then connect the horizontal that can create the separation between.
I paused once I obtained to the very prime as a result of the way in which I’ve it designed, the highest edge will truly be seen. With that, I edge banded each of those elements earlier than including them on. This is so simple as heating up an iron and warming up the glue on the again of the banding till it sticks to the plywood edge. This shall be barely completely different than the ply, but it surely doesn’t trouble me.

Step 4: Portray the Firewood Holder Cubbies
I left that the place it sat to offer that glue time to arrange and dry. Whereas it was, I grabbed items that can make up the again from my 1/2” plywood scraps. I additionally grabbed the items that can make up the perimeters. I would like each of those to be painted the identical colour as my wall which suggests I would like to offer them a number of coats earlier than attaching the cubbies.
Since I’ve the paint out, I additionally wished to color that entrance fringe of the cubbies. I first give them each a superb sanding to get them easy. Now when working with plywood, there are usually voids on each single edge. With a purpose to get a easy wanting paint floor, I apply some wooden filler on a putty knife. I’m utilizing DAP Premium wooden filler. These things not solely dries quick however is simple to sand and is nice to paint match in case you are staining one thing.
After letting it dry for about 30 minutes, I got here again with a sanding sponge to knock it down flat in order that I may roll on the paint onto the items of the firewood holder.
With ending out of the way in which, let me simply push this button right here to boost my ending shelf up and find the {hardware} I’ll want to connect the cubbies to the again.
Step 5: Shaping the Again to Match the Firewood Holder Cubbies
I began with a again barely bigger than what I wanted, then plopped the cubbies down onto it and lined it up in order that the underside cubby was flush to the tip of the plywood. I used my pin nailer to only tack issues in place to start out. The top is simple appropriately flush, however to verify the remaining weren’t crocked, I pulled a tape to get the spacing excellent earlier than tacking the remaining. With it not in a position to fall off now, I tilted all the unit on it’s face in order that I might have entry to the underside to throw in screws. Right here, I made certain to pre drill to stop splitting.

Step 6: Securing the Firewood Holder Cubbies to the Again
The highest location is simple to find as a result of you’ve a visible on the place the shelf is positioned. Nonetheless, the second is difficult as a result of it’s in the course of nowhere. What I do is seize a velocity sq., this Crescent one has an extra 6” flip out rule in order that I can place it within the middle of the shelf, go right down to the dimension wanted, and pre drill. In the event you don’t have this velocity sq. or one other lengthy one, then a stage would additionally do the trick.
For the angled portion of the cabinets, the velocity sq. wouldn’t work, so I grabbed a scrap and minimize in an angle on the tip. This manner I may relaxation it on the shelf and permit me to mark the peak. Ensuring to maintain it in the identical location, I moved the scrap to the face closest to me to now drop it down again to the road I made which provides me the placement of the angled shelf to pre drill and fix a screw.
With the again on, this factor now feels actually safe and robust. I flipped it up to have a look. I truly suppose it seems fairly good with a sq. again on it and was contemplating leaving it as is however then I made a decision to stay to my unique plan and make the again flush to the geometric form. I wasn’t in a position to find my palm router, which is definitely the best instrument to trim the again off, so as an alternative I put a flush trim bit in my router desk and trim it off that approach. The important thing right here is to maintain the unit good and flush on the desk as you progress it alongside.
I laid the unit over and connected the facet. This may assist help the horizontal cabinets that can truly be supporting the load of the firewood.

Step 7 : Putting in the Firewood Holder and Chopping Firewood
Very last thing to do was set up them. Now I personally wished mine up off the bottom so I wouldn’t block an outlet I’ve over on the proper hand facet. Then I additionally like to make use of this space for storing my video games and puzzles. With that, I propped the models up, discovered the studs, then drove a number of screws into the again of the unit to connect them.
Okay lets load it down and see how a lot it might probably maintain. Now that, is a lot better than earlier than. As an alternative of ugly packing containers and totes, I now have a pleasant firewood holder with devoted area for the wooden. This may enable me room to retailer and separate all completely different sizes of firewood throughout winter. Then I personally just like the look of wooden sufficient to maintain it full yr spherical, however I may additionally retailer other forms of nicknacks throughout spring and summer season ought to I need to.
What do y’all take into consideration them? Keep in mind how simple it’s to make bigger or smaller. I even suppose they’d look good horizontal, relying in your area. I’ve a set of plans for this undertaking in addition to many different over on my web site. The truth is, if you would like firewood storage concepts, I’ve a number of of them.
I’ll see you subsequent time.
Materials I Used For This Construct: